SpringBoot 扩展篇:ConfigFileApplicationListener源码解析
- 1.概述
- 2. ConfigFileApplicationListener定义
- 3. ConfigFileApplicationListener回调链路
- 3.1 SpringApplication#run
- 3.2 SpringApplication#prepareEnvironment
- 3.3 配置environment
- 4. 环境准备事件 ConfigFileApplicationListener#onApplicationEvent
- 4. 加载配置类
- 4.1 Loader相关属性介绍
- 4.2 Loader加载配置文件
- FilteredPropertySource#apply
- ConfigFileApplicationListener.Loader#load()
- ConfigFileApplicationListener.Loader#initializeProfiles
- Loader#addLoadedPropertySources
- ConfigFileApplicationListener.Loader#getSearchLocations()
- ConfigFileApplicationListener.Loader#load()
- ConfigFileApplicationListener.Loader#load()
- ConfigFileApplicationListener.Loader#loadForFileExtension
- ConfigFileApplicationListener.Loader#load
- 配置文件加载顺序总结
- 问题:为什么先加入到environment中的propertySource,优先级越高?
- 遗留问题:
1.概述
SpringBoot的配置文件加载由ConfigFileApplicationListener完成的,它会加载application.properties、application.yml等配置文件,还支持用户配置和扩展。本文从源码的角度分析它的原理。
加载完毕的配置信息最终都会放入到Environment中。
2. ConfigFileApplicationListener定义
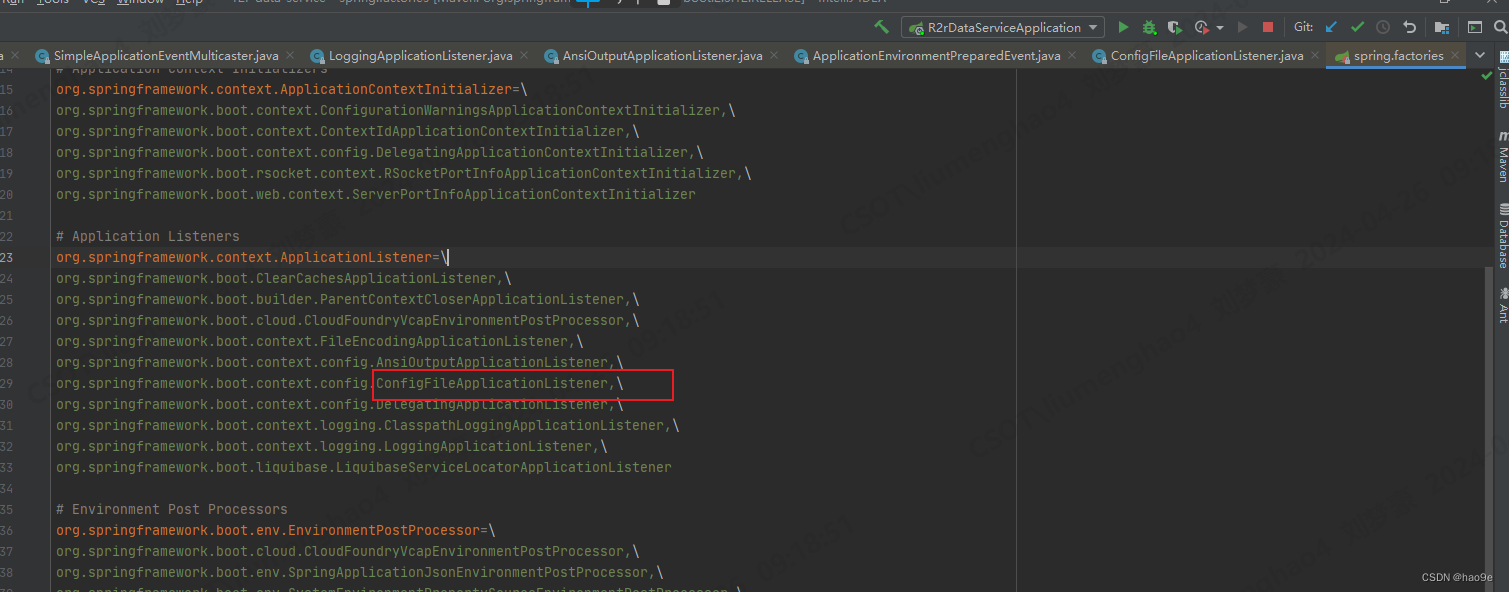
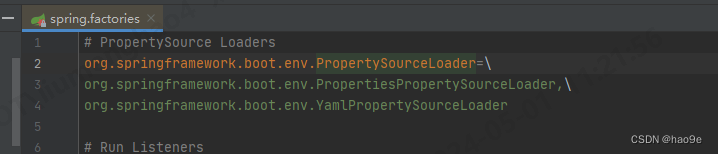
ConfigFileApplicationListener定义在spring.factories中。监听器注册和执行原理参考:SpringBoot 源码解析3:事件监听器
3. ConfigFileApplicationListener回调链路
3.1 SpringApplication#run
public ConfigurableApplicationContext run(String... args) {
	StopWatch stopWatch = new StopWatch();
	stopWatch.start();
	ConfigurableApplicationContext context = null;
	configureHeadlessProperty();
	SpringApplicationRunListeners listeners = getRunListeners(args);
	listeners.starting();
	try {
		ApplicationArguments applicationArguments = new DefaultApplicationArguments(args);
		ConfigurableEnvironment environment = prepareEnvironment(listeners, applicationArguments);
		configureIgnoreBeanInfo(environment);
		Banner printedBanner = printBanner(environment);
		context = createApplicationContext();
		prepareContext(context, environment, listeners, applicationArguments, printedBanner);
		refreshContext(context);
		afterRefresh(context, applicationArguments);
		stopWatch.stop();
		if (this.logStartupInfo) {
			new StartupInfoLogger(this.mainApplicationClass).logStarted(getApplicationLog(), stopWatch);
		}
		listeners.started(context);
		callRunners(context, applicationArguments);
	}
	catch (Throwable ex) {
		handleRunFailure(context, ex, listeners);
		throw new IllegalStateException(ex);
	}

	try {
		listeners.running(context);
	}
	catch (Throwable ex) {
		handleRunFailure(context, ex, null);
		throw new IllegalStateException(ex);
	}
	return context;
}
这是SpringBoot启动最基础的方法,调用了prepareEnvironment。
3.2 SpringApplication#prepareEnvironment
private ConfigurableEnvironment prepareEnvironment(SpringApplicationRunListeners listeners,
		ApplicationArguments applicationArguments) {
	// Create and configure the environment
	// 创建environment对象
	ConfigurableEnvironment environment = getOrCreateEnvironment();
	// 配置环境
	configureEnvironment(environment, applicationArguments.getSourceArgs());
	ConfigurationPropertySources.attach(environment);
	// 发布监听事件
	listeners.environmentPrepared(environment);
	bindToSpringApplication(environment);
	if (!this.isCustomEnvironment) {
		environment = new EnvironmentConverter(getClassLoader()).convertEnvironmentIfNecessary(environment,
				deduceEnvironmentClass());
	}
	ConfigurationPropertySources.attach(environment);
	return environment;
}
-
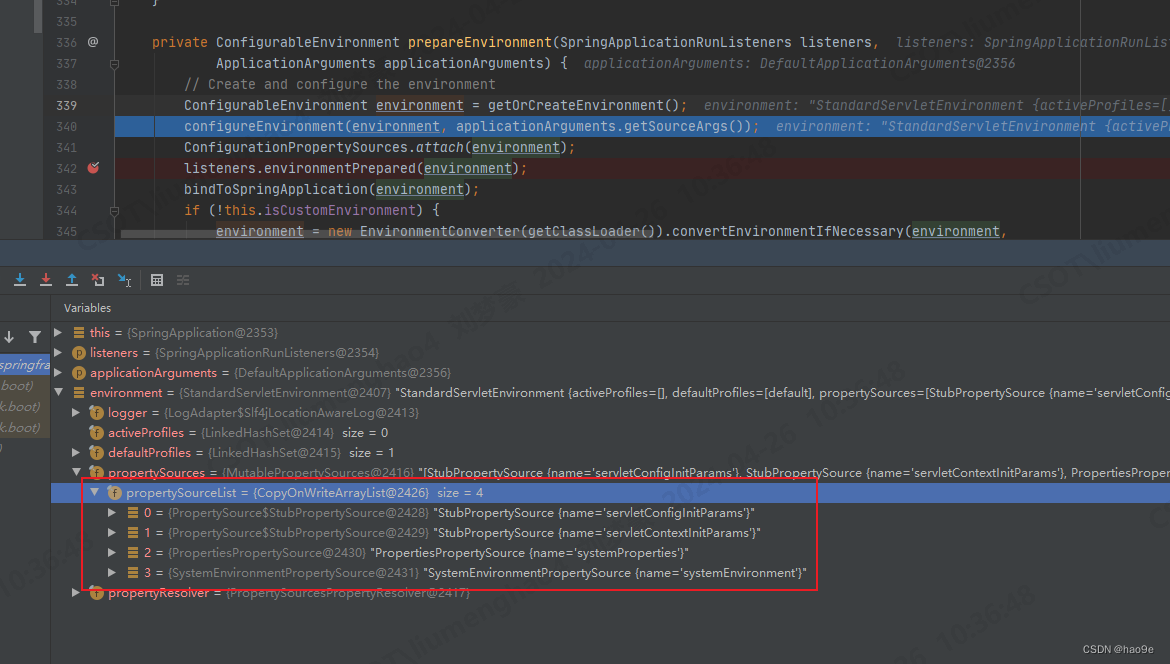
getOrCreateEnvironment创建StandardServletEnvironment,所有的启动参数和配置文件信息都会保存到environment中。environment中默认创建了4个propertySource,分别用来存放系统属性和servlet属性。
-
configureEnvironment配置环境信息,此时配置文件还没解析。
-
listeners.environmentPrepared,调用监听器ConfigFileApplicationListener解析配置文件。最终回调了ConfigFileApplicationListener#onApplicationEvent,这里是解析文件的核心逻辑。
@Override
public void environmentPrepared(ConfigurableEnvironment environment) {
	this.initialMulticaster
			.multicastEvent(new ApplicationEnvironmentPreparedEvent(this.application, this.args, environment));
}
监听器发布的是ApplicationEnvironmentPreparedEvent类型的事件。
- bindToSpringApplication解析完毕所有的配置文件信息之后,将spring.main.*的环境变量与当前的springApplication对象的属性绑定。比如allowBeanDefinitionOverriding配置就是在这里读取的。
3.3 配置environment
SpringApplication#configureEnvironment
protected void configureEnvironment(ConfigurableEnvironment environment, String[] args) {
	if (this.addConversionService) {
		ConversionService conversionService = ApplicationConversionService.getSharedInstance();
		environment.setConversionService((ConfigurableConversionService) conversionService);
	}
	configurePropertySources(environment, args);
	configureProfiles(environment, args);
}
- 第二个参数args为SpringBoot启动参数。
- configurePropertySources方法会将启动参数解析保存到environment中。
protected void configurePropertySources(ConfigurableEnvironment environment, String[] args) {
	MutablePropertySources sources = environment.getPropertySources();
	if (this.defaultProperties != null && !this.defaultProperties.isEmpty()) {
		sources.addLast(new MapPropertySource("defaultProperties", this.defaultProperties));
	}
	if (this.addCommandLineProperties && args.length > 0) {
		String name = CommandLinePropertySource.COMMAND_LINE_PROPERTY_SOURCE_NAME;
		if (sources.contains(name)) {
			PropertySource<?> source = sources.get(name);
			CompositePropertySource composite = new CompositePropertySource(name);
			composite.addPropertySource(
					new SimpleCommandLinePropertySource("springApplicationCommandLineArgs", args));
			composite.addPropertySource(source);
			sources.replace(name, composite);
		}
		else {
			sources.addFirst(new SimpleCommandLinePropertySource(args));
		}
	}
}
通过addFirst会将启动参数的属性添加到第一个PropertySources,优先级最高。
protected <T> T getProperty(String key, Class<T> targetValueType, boolean resolveNestedPlaceholders) {
	if (this.propertySources != null) {
		for (PropertySource<?> propertySource : this.propertySources) {
			if (logger.isTraceEnabled()) {
				logger.trace("Searching for key '" + key + "' in PropertySource '" +
						propertySource.getName() + "'");
			}
			Object value = propertySource.getProperty(key);
			if (value != null) {
				if (resolveNestedPlaceholders && value instanceof String) {
					value = resolveNestedPlaceholders((String) value);
				}
				logKeyFound(key, propertySource, value);
				return convertValueIfNecessary(value, targetValueType);
			}
		}
	}
	if (logger.isTraceEnabled()) {
		logger.trace("Could not find key '" + key + "' in any property source");
	}
	return null;
}
如果有多个相同的key在不同的propertySource中,在通过key从environment中获取值的时候,会遍历所有的PropertySources,获取到第一个就会返回。
3. configureProfiles方法
protected void configureProfiles(ConfigurableEnvironment environment, String[] args) {
	Set<String> profiles = new LinkedHashSet<>(this.additionalProfiles);
	profiles.addAll(Arrays.asList(environment.getActiveProfiles()));
	environment.setActiveProfiles(StringUtils.toStringArray(profiles));
}
通过environment.getActiveProfiles() 获取spring.profiles.active的值,此时的配置文件还没有解析,获取到的是启动参数中的值。
4. 环境准备事件 ConfigFileApplicationListener#onApplicationEvent
由上文可知,发布的是ApplicationEnvironmentPreparedEvent类型的事件
@Override
public void onApplicationEvent(ApplicationEvent event) {
	if (event instanceof ApplicationEnvironmentPreparedEvent) {
		onApplicationEnvironmentPreparedEvent((ApplicationEnvironmentPreparedEvent) event);
	}
	if (event instanceof ApplicationPreparedEvent) {
		onApplicationPreparedEvent(event);
	}
}

private void onApplicationEnvironmentPreparedEvent(ApplicationEnvironmentPreparedEvent event) {
	List<EnvironmentPostProcessor> postProcessors = loadPostProcessors();
	postProcessors.add(this);
	AnnotationAwareOrderComparator.sort(postProcessors);
	for (EnvironmentPostProcessor postProcessor : postProcessors) {
		postProcessor.postProcessEnvironment(event.getEnvironment(), event.getSpringApplication());
	}
}
loadPostProcessors会从spring.factories中加载所有EnvironmentPostProcessor类型的处理器。
SpringBoot 基础概念:SpringApplication#getSpringFactoriesInstances
最终将自己加入到这些处理器中,然后依次执行postProcessEnvironment方法。
4. 加载配置类
加载配置类的核心逻辑的入口在 ConfigFileApplicationListener#postProcessEnvironment。
@Override
public void postProcessEnvironment(ConfigurableEnvironment environment, SpringApplication application) {
	addPropertySources(environment, application.getResourceLoader());
}
protected void addPropertySources(ConfigurableEnvironment environment, ResourceLoader resourceLoader) {
	RandomValuePropertySource.addToEnvironment(environment);
	new Loader(environment, resourceLoader).load();
}
可以看到,加载配置的逻辑交给了Loader。
4.1 Loader相关属性介绍
Loader是ConfigFileApplicationListener的内部类。
构造器
Loader(ConfigurableEnvironment environment, ResourceLoader resourceLoader) {
	this.environment = environment;
	this.placeholdersResolver = new PropertySourcesPlaceholdersResolver(this.environment);
	this.resourceLoader = (resourceLoader != null) ? resourceLoader : new DefaultResourceLoader();
	this.propertySourceLoaders = SpringFactoriesLoader.loadFactories(PropertySourceLoader.class,
			getClass().getClassLoader());
}
propertySourceLoaders 是从spring.factories文件中加载的配置文件加载器。
PropertiesPropertySourceLoader负责读取*.properties、*.xml中的内容
public class PropertiesPropertySourceLoader implements PropertySourceLoader {

	private static final String XML_FILE_EXTENSION = ".xml";

	@Override
	public String[] getFileExtensions() {
		return new String[] { "properties", "xml" };
	}
	....
}
YamlPropertySourceLoader负责读取*.yml、*.yaml文件中的内容
public class YamlPropertySourceLoader implements PropertySourceLoader {

	@Override
	public String[] getFileExtensions() {
		return new String[] { "yml", "yaml" };
	}
}
ConfigFileApplicationListener中的属性
private static final String DEFAULT_PROPERTIES = "defaultProperties";

// Note the order is from least to most specific (last one wins)
private static final String DEFAULT_SEARCH_LOCATIONS = "classpath:/,classpath:/config/,file:./,file:./config/";

private static final String DEFAULT_NAMES = "application";

private static final Set<String> NO_SEARCH_NAMES = Collections.singleton(null);

private static final Bindable<String[]> STRING_ARRAY = Bindable.of(String[].class);

private static final Bindable<List<String>> STRING_LIST = Bindable.listOf(String.class);

private static final Set<String> LOAD_FILTERED_PROPERTY;

static {
	Set<String> filteredProperties = new HashSet<>();
	filteredProperties.add("spring.profiles.active");
	filteredProperties.add("spring.profiles.include");
	LOAD_FILTERED_PROPERTY = Collections.unmodifiableSet(filteredProperties);
}
Loader类中的属性
private final Log logger = ConfigFileApplicationListener.this.logger;

// environment,Spring所有解析的配置信息和启动参数都放入到了environment中
private final ConfigurableEnvironment environment;

// 占位符解析器,解析${key}
private final PropertySourcesPlaceholdersResolver placeholdersResolver;

// 资源加载器,加载文件资源
private final ResourceLoader resourceLoader;

private final List<PropertySourceLoader> propertySourceLoaders;

// profile对应spring.profiles.active、spring.profiles.include、spring.profiles.default对应的配置属性
private Deque<Profile> profiles;

private List<Profile> processedProfiles;

private boolean activatedProfiles;

private Map<Profile, MutablePropertySources> loaded;

private Map<DocumentsCacheKey, List<Document>> loadDocumentsCache = new HashMap<>();
4.2 Loader加载配置文件
FilteredPropertySource#apply
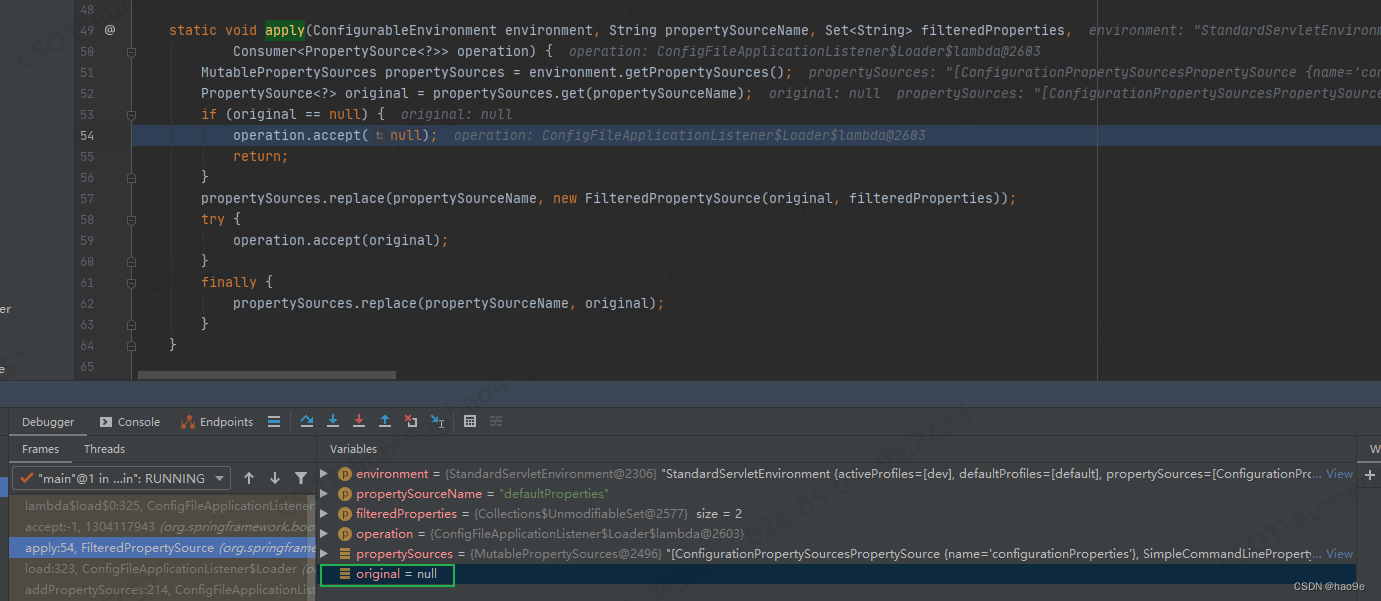
static void apply(ConfigurableEnvironment environment, String propertySourceName, Set<String> filteredProperties,
		Consumer<PropertySource<?>> operation) {
	MutablePropertySources propertySources = environment.getPropertySources();
	PropertySource<?> original = propertySources.get(propertySourceName);
	// 判断environment中是否有名称为"defaultProperties"的资源
	if (original == null) {
		// 如果没有defaultProperties资源,那么就回调Loader类中的Consumer方法
		operation.accept(null);
		return;
	}
	// 如果有defaultProperties资源,就封装成FilteredPropertySource
	propertySources.replace(propertySourceName, new FilteredPropertySource(original, filteredProperties));
	try {
		// 回调Loader类中的Consumer方法
		operation.accept(original);
	}
	finally {
		// 替换PropertySource
		propertySources.replace(propertySourceName, original);
	}
}
如果environment中没有名称为“defaultProperties”属性资源,那么就直接回调Loader中的Consumer方法 (defaultProperties) -> { … } ,参数为null。
Springboot默认是没有defaultProperties的
ConfigFileApplicationListener.Loader#load()
对加载配置文件时所需的属性初始化。
void load() {
	FilteredPropertySource.apply(this.environment, DEFAULT_PROPERTIES, LOAD_FILTERED_PROPERTY,
			(defaultProperties) -> {
				this.profiles = new LinkedList<>();
				this.processedProfiles = new LinkedList<>();
				this.activatedProfiles = false;
				this.loaded = new LinkedHashMap<>();
				// 初始化profile
				initializeProfiles();
				while (!this.profiles.isEmpty()) {
					Profile profile = this.profiles.poll();
					if (isDefaultProfile(profile)) {
						addProfileToEnvironment(profile.getName());
					}
					// 加载配置文件
					load(profile, this::getPositiveProfileFilter,
							addToLoaded(MutablePropertySources::addLast, false));
					this.processedProfiles.add(profile);
				}
				load(null, this::getNegativeProfileFilter, addToLoaded(MutablePropertySources::addFirst, true));
				// 将加载到的PropertySources放入到environment的最后
				addLoadedPropertySources();
				// 将所有加载到了的profiles,设置到environment中
				applyActiveProfiles(defaultProperties);
			});
}
- (defaultProperties) -> { … } 是一个函数接口 Consumer,所以需要先看 FilteredPropertySource#apply方法,在apply方法内部回调这个Consumer。
- initializeProfiles:初始化profile。
- profiles.poll先入先出,依次加载profile,后续的配置文件中有profile,也会放入到profiles中。
- addLoadedPropertySources方法,在profiles循环完毕,所有配置加载完毕,将读取到的内容添加到environment中。
ConfigFileApplicationListener.Loader#initializeProfiles
初始化profile。日常工作中profile指的是dev、uat、prod等配置,但是我们的思维不要局限于这里。
private void initializeProfiles() {
	// The default profile for these purposes is represented as null. We add it
	// first so that it is processed first and has lowest priority.
	// 1. 添加一个为null的profile
	this.profiles.add(null);
	// 获取spring.profiles.active
	Set<Profile> activatedViaProperty = getProfilesFromProperty(ACTIVE_PROFILES_PROPERTY);
	// 获取spring.profiles.include
	Set<Profile> includedViaProperty = getProfilesFromProperty(INCLUDE_PROFILES_PROPERTY);
	// 获取不在当前spring.profiles.active和spring.profiles.include范围内,并且之前获取到的spring.profiles.active(环境)
	List<Profile> otherActiveProfiles = getOtherActiveProfiles(activatedViaProperty, includedViaProperty);
	// 2. 添加不在当前spring.profiles.active和spring.profiles.include范围内的,之前获取到的spring.profiles.active
	this.profiles.addAll(otherActiveProfiles);
	// Any pre-existing active profiles set via property sources (e.g.
	// System properties) take precedence over those added in config files.
	// 3. 添加spring.profiles.include对应的profile
	this.profiles.addAll(includedViaProperty);
	// 4. 添加spring.profiles.active对应的profile
	addActiveProfiles(activatedViaProperty);
	// 5. 如果没有spring.profiles.active和spring.profiles.include,那么就使用spring.profiles.default
	if (this.profiles.size() == 1) { // only has null profile
		for (String defaultProfileName : this.environment.getDefaultProfiles()) {
			Profile defaultProfile = new Profile(defaultProfileName, true);
			this.profiles.add(defaultProfile);
		}
	}
}
profiles添加的优先顺序,决定了profile加载的顺序,先进先出
- 添加一个为null的profile。因为就算用户配置了spring.profiles.active=dev,不仅要加载application-dev.yml文件,application.yml文件也需要被加载。
- 添加不在当前spring.profiles.active和spring.profiles.include范围内的,之前获取到的spring.profiles.active。前期在SpringBoot启动的时候在SpringApplication#configureProfiles方法中就已经获取到了启动参数中的spring.profiles.active。
- 添加spring.profiles.include对应的profile。
- 添加spring.profiles.active对应的profile。
- 如果没有spring.profiles.active和spring.profiles.include,那么就使用spring.profiles.default对应的profile。
Loader#addLoadedPropertySources
将配置文件中加载的属性放入到environment中。
private void addLoadedPropertySources() {
	MutablePropertySources destination = this.environment.getPropertySources();
	List<MutablePropertySources> loaded = new ArrayList<>(this.loaded.values());
	Collections.reverse(loaded);
	String lastAdded = null;
	Set<String> added = new HashSet<>();
	for (MutablePropertySources sources : loaded) {
		for (PropertySource<?> source : sources) {
			if (added.add(source.getName())) {
				addLoadedPropertySource(destination, lastAdded, source);
				lastAdded = source.getName();
			}
		}
	}
}
loaded存放的是已经加载过的属性,它是一个LinkedHashMap,key为profile,value为propertySource,一个propertySource对应一个配置文件。会将profile加载的顺序颠倒,通过addLoadedPropertySource添加到environment中。在environment中,先加入的property,优先级越高。
所以,后加载的profile,优先级就越高。这也就是为什么上述Loader#initializeProfiles方法中this.profiles.add(null)这行代码的意义,就是为了将没有profile的文件的优先级降到最低。
ConfigFileApplicationListener.Loader#getSearchLocations()
private Set<String> getSearchLocations() {
	if (this.environment.containsProperty(CONFIG_LOCATION_PROPERTY)) {
		return getSearchLocations(CONFIG_LOCATION_PROPERTY);
	}
	Set<String> locations = getSearchLocations(CONFIG_ADDITIONAL_LOCATION_PROPERTY);
	locations.addAll(
			asResolvedSet(ConfigFileApplicationListener.this.searchLocations, DEFAULT_SEARCH_LOCATIONS));
	return locations;
}
获取文件父路径
- spring.config.location强制指定文件路径,只能从这个路径下面寻找文件
- spring.config.additional-location额外的文件查找路径
- 默认了四个路径:classpath:/,classpath:/config/,file:./,file:./config/,在asResolvedSet方法中将顺序颠倒了。
- locations中可配置文件父路径,也可能是文件的绝对路径。
ConfigFileApplicationListener.Loader#load()
private void load(Profile profile, DocumentFilterFactory filterFactory, DocumentConsumer consumer) {
	getSearchLocations().forEach((location) -> {
		boolean isFolder = location.endsWith("/");
		Set<String> names = isFolder ? getSearchNames() : NO_SEARCH_NAMES;
		names.forEach((name) -> load(location, name, profile, filterFactory, consumer));
	});
}
- 先遍历所有的locations,如果location为文件,那么就直接通过location加载配置。如果为文件夹,那么就查询获取文件名称,通过文件夹+文件名称去加载文件。
- getSearchNames() : 获取文件名称,可通过spring.config.name配置文件名称,没有配置则使用"application"。这也解释了SpringBoot启动的时候,为什么回去加载application.yml文件。
private Set<String> getSearchNames() {
	if (this.environment.containsProperty(CONFIG_NAME_PROPERTY)) {
		String property = this.environment.getProperty(CONFIG_NAME_PROPERTY);
		return asResolvedSet(property, null);
	}
	return asResolvedSet(ConfigFileApplicationListener.this.names, DEFAULT_NAMES);
}
ConfigFileApplicationListener.Loader#load()
private void load(String location, String name, Profile profile, DocumentFilterFactory filterFactory,
		DocumentConsumer consumer) {
	if (!StringUtils.hasText(name)) {
		for (PropertySourceLoader loader : this.propertySourceLoaders) {
			if (canLoadFileExtension(loader, location)) {
				load(loader, location, profile, filterFactory.getDocumentFilter(profile), consumer);
				return;
			}
		}
		throw new IllegalStateException("File extension of config file location '" + location
				+ "' is not known to any PropertySourceLoader. If the location is meant to reference "
				+ "a directory, it must end in '/'");
	}
	Set<String> processed = new HashSet<>();
	for (PropertySourceLoader loader : this.propertySourceLoaders) {
		for (String fileExtension : loader.getFileExtensions()) {
			if (processed.add(fileExtension)) {
				loadForFileExtension(loader, location + name, "." + fileExtension, profile, filterFactory,
						consumer);
			}
		}
	}
}
location可能为文件的全路径(spring.config.additional-location配置),为全路径则文件名称name为null。分成了两种方式加载文件,其实两种方式的逻辑是一样的。我们关注下半部分location + name, “.” + fileExtension加载方式。
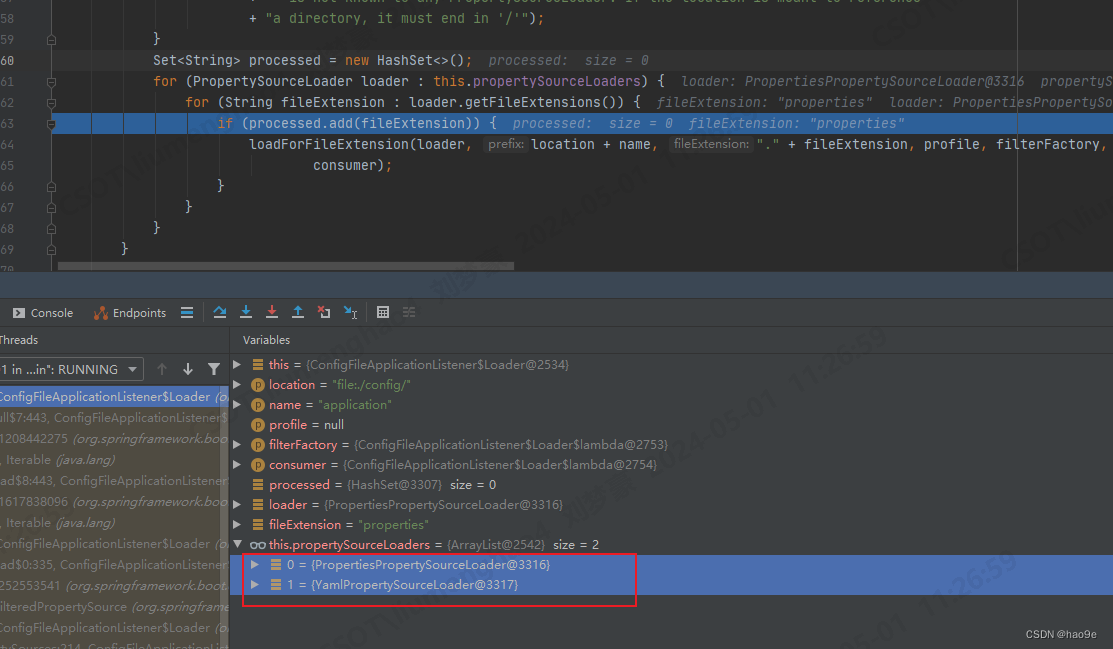
先使用Properties加载器,在使用Yaml加载器。这就是为什么properties文件优先级高于yaml文件的原因。
ConfigFileApplicationListener.Loader#loadForFileExtension
通过文件的扩展名称加载
private void loadForFileExtension(PropertySourceLoader loader, String prefix, String fileExtension,
		Profile profile, DocumentFilterFactory filterFactory, DocumentConsumer consumer) {
	DocumentFilter defaultFilter = filterFactory.getDocumentFilter(null);
	DocumentFilter profileFilter = filterFactory.getDocumentFilter(profile);
	if (profile != null) {
		// Try profile-specific file & profile section in profile file (gh-340)
		String profileSpecificFile = prefix + "-" + profile + fileExtension;
		load(loader, profileSpecificFile, profile, defaultFilter, consumer);
		load(loader, profileSpecificFile, profile, profileFilter, consumer);
		// Try profile specific sections in files we've already processed
		for (Profile processedProfile : this.processedProfiles) {
			if (processedProfile != null) {
				String previouslyLoaded = prefix + "-" + processedProfile + fileExtension;
				load(loader, previouslyLoaded, profile, profileFilter, consumer);
			}
		}
	}
	// Also try the profile-specific section (if any) of the normal file
	load(loader, prefix + fileExtension, profile, profileFilter, consumer);
}
- prefix为文件夹路径+文件名称,比如:file:./config/application
- 如果profile不为空,那么就使用prefix + “-” + profile + fileExtension加载,比如:file:./config/application-dev.yml。
- 最后,不管profile是否为空,都会通过prefix + fileExtension加载,比如:file:./config/application.yml。
ConfigFileApplicationListener.Loader#load
private void load(PropertySourceLoader loader, String location, Profile profile, DocumentFilter filter,
		DocumentConsumer consumer) {
	try {
		// 判断文件资源是否存在
		Resource resource = this.resourceLoader.getResource(location);
		if (resource == null || !resource.exists()) {
			if (this.logger.isTraceEnabled()) {
				StringBuilder description = getDescription("Skipped missing config ", location, resource,
						profile);
				this.logger.trace(description);
			}
			return;
		}
		// 校验文件扩展名称不为空
		if (!StringUtils.hasText(StringUtils.getFilenameExtension(resource.getFilename()))) {
			if (this.logger.isTraceEnabled()) {
				StringBuilder description = getDescription("Skipped empty config extension ", location,
						resource, profile);
				this.logger.trace(description);
			}
			return;
		}
		// 读取配置文件中配置,转换成Document
		String name = "applicationConfig: [" + location + "]";
		List<Document> documents = loadDocuments(loader, name, resource);
		if (CollectionUtils.isEmpty(documents)) {
			if (this.logger.isTraceEnabled()) {
				StringBuilder description = getDescription("Skipped unloaded config ", location, resource,
						profile);
				this.logger.trace(description);
			}
			return;
		}
		List<Document> loaded = new ArrayList<>();
		// 添加新的active和include的profile
		for (Document document : documents) {
			if (filter.match(document)) {
				addActiveProfiles(document.getActiveProfiles());
				addIncludedProfiles(document.getIncludeProfiles());
				loaded.add(document);
			}
		}
		// 将此次加载的Document顺序颠倒
		Collections.reverse(loaded);
		if (!loaded.isEmpty()) {
			loaded.forEach((document) -> consumer.accept(profile, document));
			if (this.logger.isDebugEnabled()) {
				StringBuilder description = getDescription("Loaded config file ", location, resource, profile);
				this.logger.debug(description);
			}
		}
	}
	catch (Exception ex) {
		throw new IllegalStateException("Failed to load property source from location '" + location + "'", ex);
	}
}
- 通过一系列的校验,比如文件资源、文件扩展名是否存在。当校验都通过了,才会去加载资源。
- loadDocuments方法读取配置文件中的信息,封装成了Document返回。虽然返回的是List,实际上List中只有一个元素,因为每次只会加载一个资源文件。可能是Spring为了扩展,而返回List吧。
private List<Document> loadDocuments(PropertySourceLoader loader, String name, Resource resource)
		throws IOException {
	DocumentsCacheKey cacheKey = new DocumentsCacheKey(loader, resource);
	List<Document> documents = this.loadDocumentsCache.get(cacheKey);
	if (documents == null) {
		List<PropertySource<?>> loaded = loader.load(name, resource);
		documents = asDocuments(loaded);
		this.loadDocumentsCache.put(cacheKey, documents);
	}
	return documents;
}
加载资源文件,根据文件的扩展名,回调了对应的PropertiesPropertySourceLoader#load、YamlPropertySourceLoader#load。
- resourceLoader.getResource获取文件资源支持通过URL获取。DefaultResourceLoader#getResource。
@Override
public Resource getResource(String location) {
	Assert.notNull(location, "Location must not be null");

	for (ProtocolResolver protocolResolver : getProtocolResolvers()) {
		Resource resource = protocolResolver.resolve(location, this);
		if (resource != null) {
			return resource;
		}
	}

	if (location.startsWith("/")) {
		return getResourceByPath(location);
	}
	else if (location.startsWith(CLASSPATH_URL_PREFIX)) {
		return new ClassPathResource(location.substring(CLASSPATH_URL_PREFIX.length()), getClassLoader());
	}
	else {
		try {
			// Try to parse the location as a URL...
			URL url = new URL(location);
			return (ResourceUtils.isFileURL(url) ? new FileUrlResource(url) : new UrlResource(url));
		}
		catch (MalformedURLException ex) {
			// No URL -> resolve as resource path.
			return getResourceByPath(location);
		}
	}
}
- asDocuments,将加载到的资源封装成Document
private List<Document> asDocuments(List<PropertySource<?>> loaded) {
	if (loaded == null) {
		return Collections.emptyList();
	}
	return loaded.stream().map((propertySource) -> {
		Binder binder = new Binder(ConfigurationPropertySources.from(propertySource),
				this.placeholdersResolver);
		return new Document(propertySource, binder.bind("spring.profiles", STRING_ARRAY).orElse(null),
				getProfiles(binder, ACTIVE_PROFILES_PROPERTY), getProfiles(binder, INCLUDE_PROFILES_PROPERTY));
	}).collect(Collectors.toList());
}
通过binder将propertySource中的spring.profiles.active和spring.profiles.include解析成String数组,分别绑定到了Document对象的activeProfiles和includeProfiles属性,以便后面使用。
6. 遍历所有的Document对象,实际上只有一个Document,因为文件资源只有一个。将Document中的activeProfiles和includeProfiles重新加入到profiles中。因为最外面第一层Loader#load()中正在遍历profiles,下次循环会重新加载后续的profile。
7. loaded.forEach((document) -> consumer.accept(profile, document));
配置文件加载顺序总结
- 遍历profile。假如启动脚本中有spring.profiles.active、spring.profiles.include的profile为dev,则遍历null、dev。现进先出,先加载为null的profile。越先加载的profile,优先级越低。
- 遍历location。相关配置:spring.config.location、spring.config.additional-location,默认配置为classpath:/,classpath:/config/,file:./,file:./config/。注意:会先将location的顺序颠倒,再去加载。
- 遍历文件名称。相关配置spring.config.name。默认application。
- 判断文件名称是否为空。如果location不是文件夹(不以“/”结尾,那么就认为不是文件夹),则使用location去加载文件。否则就拼接文件名称加载。
- 遍历文件扩展名。先遍历资源加载器,每一个资源加载器都支持不同的文件扩展名。PropertiesPropertySourceLoader支持properties、xml,YamlPropertySourceLoader支持yml、yaml。
- 最终将加载到的所有信息放入到ConfigFileApplicationListener.Loader#loaded。loaded是LinkedHashMap,key为profile,value为对应的文件名称加载是所有资源propertySource。最终会颠倒profile加载的顺序,将propertySource放入到environment中。
- 放入environment的先后顺序决定了取配置的优先级,越先加入到environment中的propertySource,优先级越高。
问题:为什么先加入到environment中的propertySource,优先级越高?
environment#getProperty()获取属性key所对应的值。调用链路如下
AbstractEnvironment#getProperty(java.lang.String)
public String getProperty(String key) {
	return this.propertyResolver.getProperty(key);
}
org.springframework.core.env.PropertySourcesPropertyResolver#getProperty(java.lang.String)
public String getProperty(String key) {
	return getProperty(key, String.class, true);
}
PropertySourcesPropertyResolver#getProperty(java.lang.String, java.lang.Class, boolean)
protected <T> T getProperty(String key, Class<T> targetValueType, boolean resolveNestedPlaceholders) {
	if (this.propertySources != null) {
		for (PropertySource<?> propertySource : this.propertySources) {
			if (logger.isTraceEnabled()) {
				logger.trace("Searching for key '" + key + "' in PropertySource '" +
						propertySource.getName() + "'");
			}
			Object value = propertySource.getProperty(key);
			if (value != null) {
				if (resolveNestedPlaceholders && value instanceof String) {
					value = resolveNestedPlaceholders((String) value);
				}
				logKeyFound(key, propertySource, value);
				return convertValueIfNecessary(value, targetValueType);
			}
		}
	}
	if (logger.isTraceEnabled()) {
		logger.trace("Could not find key '" + key + "' in any property source");
	}
	return null;
}
我们可以很清晰的看到,遍历了propertySources,从propertySource取到不为null的值。解析占位符、转换值类型之后,就返回了。
遗留问题:
- bootstrap.yml加载逻辑BootstrapApplicationListener。
- nacos中的配置文件如何加载到的?getSearchLocations中使用URL协议吗?nacos源码研究。